
Windows Virtual PC 7 is the successor to Virtual PC 2007, and the only version of Virtual PC that can run on Windows 7. It's freely available to anyone, and if you have Windows 7 Professional or Ultimate, you can also download Windows XP Mode, a virtual machine of Windows XP that allows you to run applications that may not otherwise work on Windows 7.
It seems however that Microsoft has removed the UI for using floppy disks with Windows Virtual PC 7. It was there in Virtual PC 2007, and now it's not. However, here's the thing: they only removed the UI, not the functionality itself.
The functionality for using floppy disks is still available in Windows Virtual PC 7, but it's only accessible via the COM object, which is not very convenient. Fortunately, Windows 7 also includes PowerShell, a very powerful shell scripting environment, that allows us to make things a bit easier.
Below, I present three PowerShell scripts: one to create virtual floppy disk images, one to attach floppy disks to a VM, and one to release them. The latter two can be used with both virtual floppy disk images, or a real floppy drive on the host computer.
You can download all three scripts here. Or you can just copy/paste them into a file, whichever you prefer. Note that you'll need to configure PowerShell to allow unsigned scripts to run, or sign the scripts.
Anyway, here are the scripts:
Create-VirtualFloppy.ps1:
param(
    [parameter(Position=0, Mandatory=$true)][string]$Path
)

$vpc = New-Object -ComObject "VirtualPC.Application"
if( -not [System.IO.Path]::IsPathRooted($Path) )
{
    # CreateFloppyDiskImage requires an absolute path
    [Environment]::CurrentDirectory = (Get-Location -PSProvider FileSystem).ProviderPath
    $Path = [System.IO.Path]::GetFullPath($Path)
}
$vpc.CreateFloppyDiskImage($Path, 2)
Attach-VirtualFloppy.ps1:
param(
  [parameter(Position=0, Mandatory=$true)][string]$VirtualMachineName,
  [parameter(Position=1, Mandatory=$true)][string]$FloppyPath,
  [parameter(Mandatory=$false)][Switch]$HostDrive
)

$vpc = New-Object -ComObject "VirtualPC.Application"
$vm = $vpc.FindVirtualMachine($VirtualMachineName)

if( $vm -eq $null )
{
    Write-Error "Virtual machine $vm not found."
}
else
{
    if( $HostDrive )
    {
        $vm.FloppyDrives.Item(1).AttachHostDrive($FloppyPath)
    }
    else
    {
        if( -not [System.IO.Path]::IsPathRooted($FloppyPath) )
        {
            # AttachImage requires an absolute path
            [Environment]::CurrentDirectory = (Get-Location -PSProvider FileSystem).ProviderPath
            $FloppyPath = [System.IO.Path]::GetFullPath($FloppyPath)
        }
        $vm.FloppyDrives.Item(1).AttachImage($FloppyPath)
    }
}
Release-VirtualFloppy.ps1:
param(
  [parameter(Position=0, Mandatory=$true)][string]$VirtualMachineName
)

$vpc = New-Object -ComObject "VirtualPC.Application"
$vm = $vpc.FindVirtualMachine($VirtualMachineName)

if( $vm -eq $null )
{
    Write-Error "Virtual machine not found."
}
else
{
    if( $vm.FloppyDrives.Item(1).ImageFile -ne $null )
    {
        $vm.FloppyDrives.Item(1).ReleaseImage()
    }
    elseif( $vm.FloppyDrives.Item(1).HostDriveLetter -ne $null )
    {
        $vm.FloppyDrives.Item(1).ReleaseHostDrive()
    }
    else
    {
        Write-Warning "No virtual floppy is attached to the virtual machine $VirtualMachineName."
    }
}
Using the scripts is pretty simple. Run PowerShell, navigate to the directory where you put the scripts, and invoke them. Remember that you need to enable execution of unsigned scripts (Set-ExecutionPolicy RemoteSigned), or sign the scripts.
The following example creates a virtual floppy drive image called sample.vfd, attaches it to the Windows XP Mode virtual machine, and then releases it again:
.\Create-VirtualFloppy.ps1 sample.vfd
.\Attach-VirtualFloppy.ps1 "Windows XP Mode" sample.vfd
.\Release-VirtualFloppy.ps1 "Windows XP Mode"
Please note that the virtual machine must be running for attach and release to work.
The following example attaches the host floppy drive A and then releases it again:
.\Attach-VirtualFloppy.ps1 "Windows XP Mode" A -HostDrive
.\Release-VirtualFloppy.ps1 "Windows XP Mode"
And that's it! Now you can use floppy disks with Windows Virtual PC 7 once again.
You may have heard of something called a Let's Play video. These are videos on the Internet (typically YouTube) where someone plays through a game from start to finish, often providing commentary along the way.
I quite enjoy watching these videos. When done well, they can provide some nice added value to the game, and provide an opportunity to catch up on classic games that you never had the chance to play.
For quite some time now, I have harboured the plan to make a Let's Play of my own. Now, I have finally done so. The game I have chosen to play is Riven: The Sequel to Myst. This is my favourite game of the Myst series, and perhaps my favourite game of all time. Its level of depth and immersion is unparalleled by anything else I've seen, and because I know a great deal about the world of the Myst games it presented an ideal target for a Let's Play.
The first video of the series is embedded below:
Today, I have finally uploaded the final video of the 32-part series. The whole thing was recorded in a single weekend, and uploaded one by one over the period of two weeks.
All of the videos are available in this playlist.
Enjoy!
Windows 7 is about to hit RTM, and many of you might want to verify that the ISO image you downloaded hasn't been tampered with or was damaged as the result of some error in the download process. Of course you can use existing checksum tools and compare the result to published values, but it can be a bit of a hassle.
At the request of Long Zheng I created a small application that makes this process easier. Simply drag and drop your ISO file onto the application (or start the application and browse to the ISO file) and it will verify the EXE and tell you which build you have from a list of known builds. It downloads this list from the web automatically, so you don't need to re-download the application after Windows 7 RTM is released.
The Windows 7 ISO Verifier can be downloaded from Long's website.
I have made available a new download: Ookii.Dialogs.
Ookii.Dialogs is a class library that provides a number of common dialogs for use in .Net applications. The dialogs provided are the task dialog, progress dialog, credential dialog, input dialog and Vista-style common file dialogs.
The download contains two class libraries, one for Windows Forms and one for Windows Presentation Foundation (WPF). The contents are nearly identical; only the input dialog is not available for WPF. Some utility classes are provided for Windows Forms; these are not available for WPF either.
Most of these dialogs are wrappers around Windows API functionality. The TaskDialog class wraps the task dialog API provided in Windows Vista and later. The ProgressDialog class wraps the IProgressDialog API available since Windows 2000. The CredentialDialog class wraps the CredUI API introduced in Windows XP, and the VistaOpenFileDialog, VistaSaveFileDialog and VistaFolderBrowserDialog classes wrap the IFileDialog API introduced in Windows Vista. Only the InputDialog is not a wrapper; this is a custom dialog that performs the same functionality as the old Visual Basic InputBox function. Visit the link above for more details on each dialog.
Each class has been designed to be not merely a wrapper around their respective native API, but to provide a programming interface that is natural to .Net developers, with full support for the component designer. The complete source code of the class libraries, as well as documentation and a sample application are provided.
The classes aim to give the best experience possible on each OS, where applicable. In the case of the CredentialDialog class, this means that the new Vista-style dialog is automatically used on operating systems that support it (Vista and newer). The Vista-style file dialog classes will automatically fall back to the old style dialogs when using Windows XP. This is also true of the VistaFolderBrowserDialog class for WPF, even though WPF itself doesn't provide a folder browser dialog; the VistaFolderBrowserDialog class is a full folder browser dialog implementation for WPF supporting XP and newer.
This library replaces the Ookii.VistaDialogs library, which contained only the Vista-style file dialogs and didn't offer any support for WPF.
This library is a collection of classes that I have developed for personal use over the years. Because of the difference in age of some of the code, and the many modifications made over time, there may be some inconsistencies.
Let me know what you think of it, if you use it.
If you've visited Japanese sites, you're probably used to the text looking something like this:
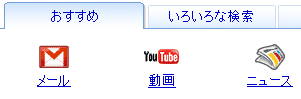
The font used here is called MS PGothic. It's quite an old font, and it actually uses bitmaps for smaller sizes like that one. This means there's no anti-aliasing at all, including ClearType. So Japanese text ends up looking a lot less nice than western text, especially if you've got ClearType enabled (which you probably do; it's on by default in Vista).
Windows Vista includes a brand new, much better, Japanese font, called Meiryo, which is optimized for screen reading and is fully ClearType enabled. Unfortunately, MS PGothic is still the default Japanese font in both Internet Explorer and Firefox.
Fortunately, we can change that by doing the following:
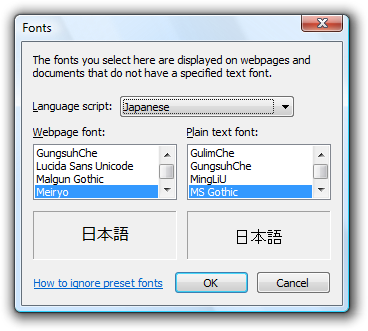
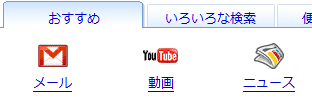
You must do this for both Japanese and Chinese, otherwise not all characters will be displayed with the new font. Now your fonts should look something like this:
You can achieve the same effect in Firefox. The following instructions apply to Firefox 3:
Of course this only applies to sites that don't specify a font. If a webpage specifies in the HTML or CSS that it wants t use PGothic or another Japanese font, it will use that instead of your selection. In Firefox you can choose to have your choice override whatever font the page specifies; in IE, you cannot.
 Subscribe